Installation and Configuration of Omnichannel – Part 2

3 MIN READ

INSTALLATION AND CONFIGURATION OF OMNICHANNEL IN CRM D365
This is the second part of the Installation and Configuration of Omnichannel for Customer Service in CRM D365.

If you are not getting the Omnichannel for Customer Service App inside Dynamics 365 Administration Center under the Application Tab to go to Part 1.

Let’s continue with the remaining part.

PURCHASE POWER BI LICENSE
You need a Power BI license for Omnichannel. It needs to be assigned to users in order to configure Omnichannel.

If you have a Power BI license and already assigned to users, then skip this part otherwise follow the below steps to get Power BI license.

microsoft 365 admin center
4. During the check-out process, you’ll be prompted for a credit card in Step 3 of the checkout process.
5. Select the option of Invoice to skip credit card details, fill details and click on Place Order button at the bottom. You will get a confirmation message.
Checkout window
6. Now go to the Admin center and assign this license to a specific user.
PROVIDE DATA ACCESS CONSENT
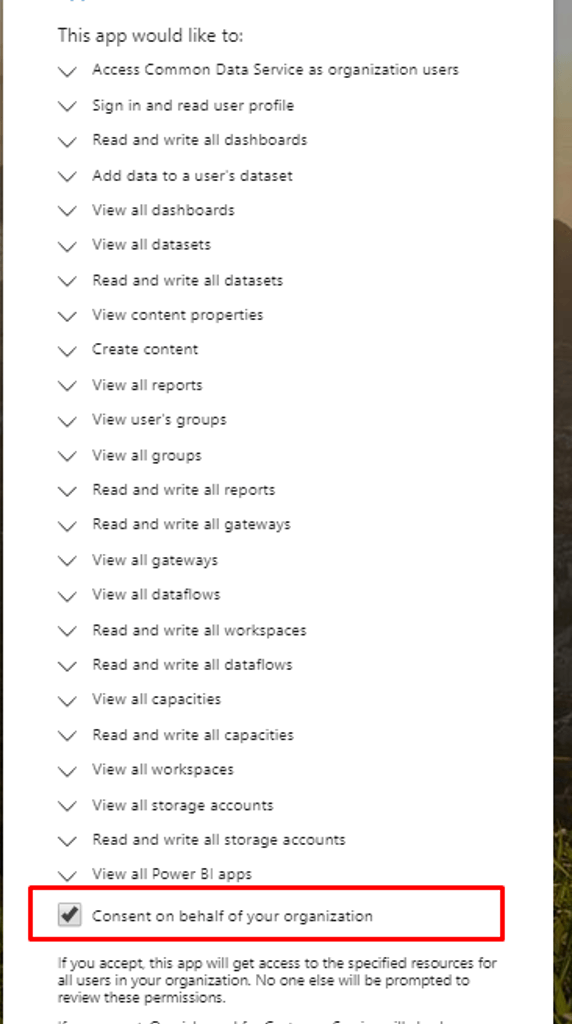
To allow Omnichannel for Customer Service to read and write data on behalf of users, follow these below steps:
  • Go to this link for data access consent URL.
  • Sign in using Global Tenant Admin credentials.
  • Your organization should select the Consent checkbox.

  • Select Accept to grant data access consent.
CONFIGURE OMNICHANNEL FOR CUSTOMER SERVICE

Step 1: Select Omnichannel for Customer Service in Dynamics 365 Administration Center under the Application Tab, and click on Manage.

If you have not provided the data access consent then it will ask you to do. Go to Provide Data Access Consent as mentioned in the above section. After that, you will be redirected to Dynamics 365 Administration Center to manage Omnichannel Instance.

Note: As an admin, you can configure Omnichannel on multiple environments (instances). You can view all organization instances where the Omnichannel app has been configured in the Manage Instances view.

 Step 3: Click on Add an org section to set up Omnichannel for the environment. Here you will be asked to select an organization. Select the organization, Check the checkbox for privacy terms and click on purple continue arrow to proceed.
dynamics 365 administration center

Step 4: Proceed with Setup Chat, SMS and Facebook by selecting the required options to enable it. At last, you will see this screen.

omnichannel set up

Step 5: Now click on the check button to complete setup on the Summary page.

Now everything will be under setup and it will take time (In my case it took hours, after some time you can close it and reopen or refresh it ). Till then you can have a coffee or go for a walk or do your pending work.

When setup will be completed you can see the below screen with all enabled channels.

manage onmichannel instances

In the next blog will be to carry out the Omnichannel configuration within Dynamics 365 for the different channels, which I’ll be going to cover in the next part of this blog.

I hope this will help you to set up the omnichannel inside CRM D365. Please Feel free to ask questions related to it and also post your comments and feedback.

Contact Us